Tuesday, September 30, 2008

Tuesdays with Dorie—Crème Brûlée

Crème Brulée in a ring moldCrème Brûlée, which means "burnt cream", used to be the dessert I'd look for on menus when eating out. A favorite restaurant of ours in Ottawa is West End Station Bistro. We used to go there so often, they knew us. Once, when the babysitter called to say we had to get home right away [baby was hungry and bottle wasn't working], the restaurant let us take home two crème brûlées to broil in our oven. The next day, we brought back the empty ramekins. Now that's customer service!

Since then, I've learned how to make this dessert and own a crème brûlée torch. It's been a fun dessert to bring to dinner parties along with the torch and let everyone caramelize their own sugar top.

It's such a versatile dessert that can be flavored any number of ways. I used Chai tea bags steeped in the milk and cream mixture for one batch. I also added a tablespoon of dulce de leche to the milk/cream mixture in another batch. But my favorite version is the original vanilla one.

Playing Around

Frozen Crème Brulée in a pyramidThe recipe I usually use for crème brûlée bakes in a water bath, the oven is set to 300˚F, and the custard bakes for 25-30 minutes. This version has no water bath, the oven is set at a lower temperature (200˚F), and the custard bakes for 1 hour (or more!). So, since it was so jiggly even after extra time in the oven, I popped it into the freezer after it cooled to room temperature. It tasted refreshing this way. In fact, the ingredients for crème brûlée are the same as crème anglaise which is the base for ice cream.

Recipe: Crème Brûlée

Ingredients for Crème BruléeYou can find the recipe for Crème Brûlée in the book Baking: From My Home to Yours (affiliate link) by Dorie Greenspan. To see how the rest of the TWD group fared with this week's recipe, click here and then click on each blogger! 

Tasting Notes
This version of crème brûlée was lighter and less dense than the recipes I've used before. It didn't set during baking as much as I expected. However, the taste was amazing. The best part of this dessert is cracking into it with a spoon and getting a mouthful of crunchy sugar with some creamy custard with it. And freezing this version worked well. For the frozen version, a piece of crackly sugar gave it the crunch it needed.
"Amelie has no boyfriend. She tried once or twice, but the results were a letdown. Instead, she cultivates a taste for small pleasures: dipping her hand into sacks of grain, cracking crème brûlée with a teaspoon and skipping stones at St. Martin's Canal."
— From the script for the movie Amelie
Recipe for Next Week (October 7)
Caramel-Peanut-Topped Brownie Cake on pages 264 and 265 chosen by Tammy of Wee Treats by Tammy.

Another Award
Nikki from Nik Snacks gave me the "You make my day award". Well, she made my day with this one. Nikki actually went to Le Cordon Bleu school, has her own blog, teaches cooking classes, is an Editorial Assistant at a local newspaper, and runs her own catering business! Now that's busy.

I now get to pass on the blog love to some of my favorite blogs:

• Kim from Scrumptious Photography has amazing photos. It's always a treat to see what she's been up to.

• Mari from Mevrouw Cupcake has inspiring takes on everything she makes and her posts are fun to read.

• Tommi from Brown Interior always makes me smile when I read her posts and her recipes are very creative and inspiring.

• Steph from Obsessed with Baking has beautiful photos of all the treats she makes in the kitchen.

• Lynne from Café Lynnylu shows off her talent with a camera with every post!

Thanks so much, Nikki. It means a lot to get an award from you!

More to Explore:


Monday, September 29, 2008

DMBLGIT September 2008 Edition—Meet the Judges

I am so excited to present the judges for the Does My Blog Look Good in This? September 2008 Edition. We have an international panel of judges, with representation from Africa, Canada and the United States including expatriates from France and Britain. Together they bring 11 years of food blogging experience to the panel of judges. Thanks to each one of these superb food artists for being willing to give of their time and expertise.

La Tartine Gourmande
Everyone in the food blog world knows the amazing and inspiring Béa Peltre, a French expatriate living in Boston, award-winning author of the food blog La Tartine Gourmande and a regular contributor for the Boston Globe Food section and the French magazine Cuisine Light. She has received numerous DMBLGIT awards (I counted seven, but I may have missed some), has been blogging since November 2005, and hosted DMBLGIT in June 2007. Stunning, inspiring, amazing. Her work resonates with passion, and we all love her for that.

"I've learned that attention to detail is important." — Béa
Photos by Béa from La Tartine Gourmande
Canon 30D


Cookbook Catchall
Sabra, from Cookbook Catchall, is a New York food photographer who has won four DMBLGIT awards and has been nominated for the Inspiring Food Photography Event, which is a monthly poll hosted by Margot from Coffee and Vanilla. Recently, Sabra did a "cook and style" shoot for the New York Times Dining Section. Her interviews and behind-the-scenes posts with famous photographers (Judd Pilossof and last week with Paul Lowe) are captivating as well. She hosted DMBLGIT in March 2008 and has been blogging since June 2006.

"Study light. If it’s natural light you use, for example, learn about the different qualities of light at different times of day, and in different areas of your studio. Learn how to manipulate the light to control it by diffusing, reflecting it, or changing the angle of it relative to your setup, etc. Light is the hardest thing to learn but has the greatest impact on the image." — Sabra
Photos by Sabra from Cookbook Catchall
Nikon D80


wrightfood
Matt, from wrightfood, is a British expatriate living in Seattle who has a passion for good clean food, especially seafood. He won the first place DMBLGIT award in June 2008 for his beautiful photo of Halibut, saffron-mussel liquor velouté, fava beans, watercress and fresh peas. He's even written a cookbook and has been blogging since June 2007.

"Really, really think about plating. Arrange food so that it looks very presentable - even if it means making your portions much smaller than you would normally eat - just for the photo. When you are done, pile your plate high if you wish!" — Matt
Photos by Matt from wrightfood
Canon 10D


BitterSweet
Hannah, from BitterSweet, is the author of the book My Sweet Vegan, which is an amazing collection of original recipes. Hannah began experimenting in the kitchen at a very young age, was one of six finalists for the Budget Recipe Challenge, and winner of the Food Blog Awards in 2007 and the Veg Bloggy Awards in 2008. Recently, she published a post about her food photography class with Lou Manna (who helped judge March 2008 DMBLGIT with Sabra). She is an inspiration who has been blogging since February 2006.

"You should never give up on a shot until you love it. Settings can be rearranged, lighting can be adjusted, food can be restyled or remade if needed, and with a bit of work, any sort of dish can be photographed beautifully." — Hannah
Photos by Hannah from BitterSweet
Canon Digital Rebel XTi


Kate, from Aapplemint, wowed all of us last month with her stunning Honey In a Spoon photo. She lives in Ghana, West Africa, but has travelled and blogged about Hong Kong, Mumbai, China and Ethiopia. She has been nominated for the Blogger's Choice Awards 2008 in the "Best Food Blog" category and is described as having "a passion and panache for beautiful food." She has been blogging since January 2007.

"Always try and visualize what your final shot will look like. Carefully think of every detail beforehand. The kind of props you will use, the background, the composition. Then when ready, make sure you have ample light and the food is fresh. Remember, food should be clicked as if you were about to eat it right away. It makes them more appealing and mouth watering. Don't just take a shot, until you are convinced that the photo has made your taste buds tingle!" — Kate
Photos by Kate from Aapplemint
Canon 400D


I will be providing some input on the judging front as well. Keep those submissions coming! Entries must be received by September 30, 2008 [tomorrow] at midnight EST (U.S.)

~Shari


Saturday, September 27, 2008

Daring Bakers—Lavash Crackers and Honeydew-Peach Salsa

Lavash Crackers and Honeydew-Peach SalsaThis month, the Daring Bakers were asked to make Lavash Crackers with a vegan and gluten-free dip. Lavash is a soft, thin flatbread of Armenian origin. (This is going to be an "almost wordless" post since it's been a busy month! 
Vegan means no animal products of any kind.

Gluten-Free means no wheat (including kamut and spelt), barley, rye, and triticale, as well as the use of gluten as a food additive in the form of a flavoring, stabilizing or thickening agent.
For my Lavash crackers, I sprinkled toasted sesame seeds and black pepper on them. I used half the dough to make cracker bowls by cutting the dough into squares and carefully laying the square inside a sprayed ramekin.

To see the different versions of Lavash crackers and dips cropping up all over the foodblogosphere, check out the Daring Bakers Blogroll. Thanks to Natalie from Gluten-A-Go-Go and Shel of Musings From the Fishbowl who hosted this month’s Daring Bakers event.

Recipe: Lavash Crackers


ingredients for Lavash Crackers and Honeydew-Peach Salsafrom The The Bread Baker's Apprentice: Mastering the Art of Extraordinary Bread (affiliate link)by Peter Reinhart (Ten Speed Press, Berkeley, CA. Copyright 2001. ISBN-10: 1-58008-268-8, ISBN-13: 978-158008-268-6)

Note: The following recipe includes directions for both gluten-free crackers (care of Natalie from Gluten-A-Go-Go) and traditional all-purpose flour crackers.

Makes 1 sheet pan of crackers

1 1/2 cups (6.75 oz) unbleached bread flour or gluten free flour blend (If you use a blend without xanthan gum, add 1 tsp xanthan or guar gum to the recipe)
1/2 tsp (.13 oz) salt
1/2 tsp (.055 oz) instant yeast
1 tbsp (.75 oz) agave syrup or sugar
1 tbsp (.5 oz) vegetable oil
1/3 to 1/2 cup + 2 tbsp (3 to 4 oz) water, at room temperature
Poppy seeds, sesame seeds, paprika, cumin seeds, caraway seeds, or kosher salt for toppings

1. In a mixing bowl, stir together the flour, salt yeast, agave, oil, and just enough water to bring everything together into a ball. You may not need the full 1/2 cup + 2 tbsp of water, but be prepared to use it all if needed.

2. For Non Gluten Free Cracker Dough: Sprinkle some flour on the counter and transfer the dough to the counter. Knead for about 10 minutes, or until the ingredients are evenly distributed. The dough should be firmer than French bread dough, but not quite as firm as bagel dough (what I call medium-firm dough), satiny to the touch, not tacky, and supple enough to stretch when pulled. Lightly oil a bowl and transfer the dough to the bowl, rolling it around to coat it with oil. Cover the bowl with plastic wrap.

or

2. For Gluten Free Cracker Dough: The dough should be firmer than French bread dough, but not quite as firm as bagel dough (what I call medium-firm dough), and slightly tacky. Lightly oil a bowl and transfer the dough to the bowl, rolling it around to coat it with oil. Cover the bowl with plastic wrap.

3. Ferment at room temperature for 90 minutes, or until the dough doubles in size. (You can also retard the dough overnight in the refrigerator immediately after kneading or mixing).

4. For Non Gluten Free Cracker Dough: Mist the counter lightly with spray oil and transfer the dough to the counter. Press the dough into a square with your hand and dust the top of the dough lightly with flour. Roll it out with a rolling pin into a paper thin sheet about 15 inches by 12 inches. You may have to stop from time to time so that the gluten can relax. At these times, lift the dough from the counter and wave it a little, and then lay it back down. Cover it with a towel or plastic wrap while it relaxes. When it is the desired thinness, let the dough relax for 5 minutes. Line a sheet pan with baking parchment. Carefully lift the sheet of dough and lay it on the parchment. If it overlaps the edge of the pan, snip off the excess with scissors.

or

4. For Gluten Free Cracker Dough: Lay out two sheets of parchment paper. Divide the cracker dough in half and then sandwich the dough between the two sheets of parchment. Roll out the dough until it is a paper thin sheet about 15 inches by 12 inches. Slowly peel away the top layer of parchment paper. Then set the bottom layer of parchment paper with the cracker dough on it onto a baking sheet.

5. Preheat the oven to 350˚F with the oven rack on the middle shelf. Mist the top of the dough with water and sprinkle a covering of seeds or spices on the dough (such as alternating rows of poppy seeds, sesame seeds, paprika, cumin seeds, caraway seeds, kosher or pretzel salt, etc.) Be careful with spices and salt - a little goes a long way. If you want to precut the cracker, use a pizza cutter (rolling blade) and cut diamonds or rectangles in the dough. You do not need to separate the pieces, as they will snap apart after baking. If you want to make shards, bake the sheet of dough without cutting it first.

5. Bake for 15 to 20 minutes, or until the crackers begin to brown evenly across the top (the time will depend on how thinly and evenly you rolled the dough).

6. When the crackers are baked, remove the pan from the oven and let them cool in the pan for about 10 minutes. You can then snap them apart or snap off shards and serve.

Recipe: Honeydew-Peach Salsa

from The Splended Table

Try the salsa with grilled seafood and poultry, or over rice noodles. Chile could be added to taste. It is best eaten within several hours of preparation. Use organic ingredients if at all possible.

juice of 1 lime
1/2 tsp minced garlic
1/4 to 1/2 cup finely diced red onion
1 Red Fresno and 1 Hot Yellow minced chile (seeds removed)
1 to 2 tsp sugar,
1/2 ripe sweet honeydew melon, cubed into bite-sized pieces
4 small, ripe peaches, peeled and cubed into bite-sized pieces
salt and freshly ground black pepper
1/3 cup minced fresh coriander, or coriander and mint combined

In a medium bowl blend the lime juice, garlic, onion and chilies. Let stand 20 minutes, then blend in sugar and fruits with salt (a generous pinch) and pepper (to make piquant) to taste. Refrigerate up to 3 hours. Fold in fresh herbs just before serving.

Copyright 1997 Lynne Rossetto Kasper, all rights reserved.

Lavash Crackers and Honeydew-Peach SalsaTasting Notes
The crackers were easy to put together and tasted wonderful, even after storing for a day or two. The salsa was a big hit and definitely a recipe worth keeping.


Tuesday, September 23, 2008

Tuesdays with Dorie—Dimply Plum Cake & some awards

Dimply Plum Cake baked in passion fruitDimply Plum Cake has been around the food blogosphere for awhile. Here's a round-up of some of the other ones out there before the food blog world gets hit by 250+ TWD members today (let me know if I missed you):

The Wednesday Chef
Kitchen Parade
My Feasts
No Special Effects
Smitten Kitchen
Rosa's Yummy Yums
Tartelette
Vegan Diva’s Blog

I now know why it's been blogged about so much. It's a delicious breakfast, afternoon, evening, anytime treat.

Playing Around

Dimply Plum Cake baked in passion fruit shellsPassion fruit has been stealing my heart and taste buds lately. It's a taste memory that goes way back for me and is my favorite fruit out there. I thought the shell of the passion fruit would be tough enough to withstand baking a mini dimply plum cake in it. It worked great.

I also tried baking the cakes in half a mango and half a yellow dragon fruit. The batter in the mango trickled out while baking on one side, but the other side looked fine. The dragon fruit stood up well, and I'll definitely use that again.

For all the shells, next time I would dry the shell out in the oven for an hour on a low heat to reduce the moisture that the cake absorbs.

Recipe: Dimply Plum Cake

Dimply Plum Cake IngredientsYou can find the recipe for Dimply Plum Cake in the book Baking: From My Home to Yours (affiliate link) by Dorie Greenspan or here. To see how the rest of the TWD group fared with this week's recipe, click here and then click on each blogger! Thanks to Michelle of Bake-en who chose the recipe for this week.

Dimply Plum Cake baked in passion fruit, dragon fruit and mangoTasting Notes
I loved the crunch of passion fruit seeds in the cake (but you could strain the seeds out if you don't like them). The hint of cardamom was delicious too. This cake was gobbled up quicker (mostly by me!) than a lot of other desserts that come into our hosue. Usually, when reading other TWD posts, I have the urge to nibble on whatever it is we made that week. I won't be able to do that this week, unless I make it again…soon. And I will.
"The Lion and the Unicorn were fighting for the crown:
The Lion beat the Unicorn all round the town.
Some gave them white bread, some gave them brown;
Some gave them plum-cake and drummed them out of town."
Chapter 7, Through the Looking Glass by Lewis Carroll
Recipe for Next Week (September 30)
Creme Brulée on page 393.

Awards
In the past month, I've been lucky enough to get two awards from three different bloggers.

Karen from Something Sweet by Karen and Laura from She's Cookin' Now both gave me the "E for Excellent" award. Karen has beautiful photos of her kitchen creations, and I'm so glad she kept on blogging instead of deleting her gorgeous blog! Laura's turkey chili looks amazing as do her blueberry muffins. Check them out!

Esther & Hannah from Del Sisters Kitchen gave me the "I Love You This Much" award. Esther & Hanna are two sisters baking up a storm together.

Thanks so much, you guys. It means a lot to get these blog awards and feel supported and loved in the food blogging world. It's a treat to be part of this community!

More to Explore:


Monday, September 22, 2008

Sugar High Fridays (SHF) #47 Cupcakes—Passion Fruit and Orange in Love with a Fluffy Sponge Cupcake Kissed with Marshmallow Vanilla Frosting

Passion Fruit and Orange Fluffy Sponge Cupcake with Marshmallow Vanilla Frosting
Passion Fruit and Orange
in Love with a
Fluffy Sponge Cupcake
Kissed with Marshmallow Vanilla Frosting

How's that for a recipe title? I was inspired once again by the menu at Plus Minus Café in Mont Tremblant. I know most people's favorite cake flavor is chocolate, but I love vanilla. And this one contains passion fruit (my all-time favorite fruit), orange and vanilla.

I've been playing around with baking cakes in different fruits lately. This time, I thought it would be fun to bake the vanilla white cake inside an orange shell so that the shell would infuse the cake.

Passion Fruit and Orange Fluffy Sponge Cupcake with Marshmallow Vanilla FrostingThe frosting I used is a favorite of mine that is light, and airy and can take on any flavors you throw into it, including cinnamon and nutmeg or passion fruit and orange.


This is my submission to Sugar High Fridays, a dessert-focused food-blogging event created by fellow Canadian and food blogger extraordinaire Jennifer from The Domestic Goddess. This month's event is hosted by the amazing and inspiring Fanny from Foodbeam.


Recipe: Passion Fruit and Orange in Love with a Fluffy Sponge Cupcake Kissed with Marshmallow Vanilla Frosting

This half recipe makes 1 dozen cupcakes.

Passion Fruit and Orange Fluffy Sponge Cupcake with Marshmallow Vanilla Frosting Ingredients

Ingredients:

For the Orange Shells

12 orange shells (I used clementines)

For the Cupcakes

3 egg whites (about 6 tablespoons)
¼ teaspoon cream of tartar (optional, but it will help stabilize the egg whites when beaten)
¾ cup flour
½ teaspoon baking powder
¼ teaspoon salt
3 egg yolks (about ¼ cup)
¾ cup sugar
2½ tablespoon cold water
1 teaspoon vanilla
1 teaspoon passion fruit, scooped (straining the seeds is optional)
1 teaspoon freshly squeezed orange juice

For the Frosting

1 cup sugar
½ cup water
4 large egg whites, at room temperature
2 teaspoons vanilla
2 teaspoons passion fruit, scooped (straining the seeds is optional)
2 teaspoons freshly squeezed orange juice

Instructions:

To prepare the orange shells: Slice off the top of the orange and use a grapefruit spoon to clean it out. Center a rack in the oven and preheat the oven to 250°F. Bake the shells for 1 hour, until they are dried out. Transfer the orange shells to a cooling rack and let cool to room temperature.

To get ready for the cupcakes: Center a rack in the oven and preheat the oven to 325°F.

To make the cupcakes: Sift together the flour, baking powder, and salt.

Working with a stand mixer, preferably fitted with a whisk attachment, whisk the egg whites and cream of tartar (if using) until soft peaks form.

In another bowl, working with a stand mixer fitted with the paddle attachment, beat egg yolks until thick and lemon colored. Gradually, beat in sugar.

In a small bowl, mix the water, vanilla, passion fruit, and orange.

Reduce the mixer speed to low and add the dry ingredients alternately with water and flavorings, adding the dry ingredients in 2 additions and the water mixture in 1 (begin and end with the dry ingredients). Scrape down the sides of the bowl as required and mix only until the ingredients are absorbed into the batter. The batter will be thick.

Using a rubber spatula, fold the egg whites into the cupcake batter in 3 additions.

Using a piping bag, fill the cupcake shells (or orange shells) ¾ full.

To bake the cupcakes: Bake for 25-30 minutes, until the cupcakes are golden on top and a thin knife inserted into the center comes out clean. Transfer the cupcakes to a cooling rack and let cool to room temperature. When cool, the cupcakes can be wrapped and kept at room temperature overnight.

To make the frosting: Combine the sugar and water in a small saucepan. Boil the mixture until it reaches 248˚F (120˚C) on a candy thermometer.

While the sugar is melting, working with a stand mixer, preferably fitted with a whisk attachment, whisk the egg whites until soft peaks form.

Reduce the mixer speed to medium. While beating the egg whites, carefully drizzle the hot syrup into the bowl, pouring it between the spinning beater(s) and the sides of the bowl. Increase the mixer’s speed to high and beat the egg whites until cool (but not too much or the mixture will separate). Frost the cupcakes and drizzle with reserved passion fruit.

Passion Fruit and Orange Fluffy Sponge Cupcake with Marshmallow Vanilla FrostingTasting Notes
These cupcakes have a delicate crumb, light and fruity taste, and are perfect for a shower or afternoon tea.

If you want to serve them in the orange shells, give your guests a spoon to eat it with because the orange shell gets hard and difficult to peel without using a pair of scissors. But, as they say "It is better to look good than to feel good."


Wednesday, September 17, 2008

Whisk Wednesdays—Éstouffade de Boeuf Provençale (Braised Beef Casserole, Provence Style)

Éstouffade de Boeuf Provençale (Braised Beef Casserole, Provence Style)Éstouffade (Es-too-fahd) de Boeuf Provençale or Pot Roast. Which sounds better? The French have a flair for making food sound fancy and delicious. And this dish doesn't just sound delicious, it is delicious.

Éstouffade is a beef stew simmered slowly in a covered casserole dish. The technique is braising, where your goal as "Chef" is to take a cheap, tough cut of meat and make it tender and tasty. Unlike stewing which uses small chunks of meat, braising usually uses a large cut of meat. Turning a hunk of meat into a tender morsel is a bit of magic and science.

A Demo
A few years ago, I attended a demo at Le Cordon Bleu in Basic Cuisine, and it was this class #16 " Les Braisages (Braising)". I casually walked into the classroom before it began, as I have often done for other classes. I and another visitor both found a spot to sit and watched the Chef prepare for the class. I was wondering why the students milling about in the hallway outside weren't coming in, but I realized that at precisely 8:15 a.m., they were allowed to enter and find their seats. Of course, they all addressed the Chef as "Chef" with a capital "C". "Yes, Chef" and "Excuse me, Chef" were heard throughout the morning. I thoroughly enjoyed being a fly on the wall during this demo class. I've enjoyed looking over my notes from that class {after finding them buried under a huge pile of recipes yet to try].

The recipes covered that day were

Boeuf à la mode (Pot-roast)
Carré de porc braisé nivernaise (Braised pork rack with carrots, onions, potatoes and lettuce)
Navarin d'agneau printanier (Braised lamb shoulder stew)

As the Chef prepared the dishes, he talked easily about how lamb is fed, how long it takes to grow a chicken, the use of steroids and antibiotics in poultry, the benefits of organic meat, and occasionally quizzed the students about terminology.

As he was explaining how to butcher meat and the benefits of doing it by hand in your own kitchen, one student bravely asked why he couldn't go to the butcher and buy it already cut. The steely eyes and frustrated tone of the Chef answered him quickly, saying that a chef must be able to do all the food preparation.
"A good chef is worth ten doctors. In Napoleon's army, every captain was a chef."
– So Said the Chef at Le Cordon Bleu that day
Choose the Meat
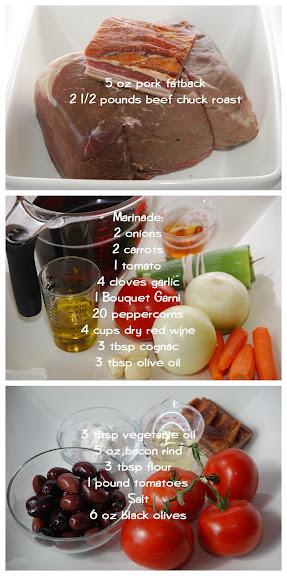
The meat you select for braising should be one of the leaner, tougher cuts, such as shoulder, shank or chuck. {Save your tenderloin for the grill!} Also, the shank adds more gelatin to the mix so the sauce is thicker at the end of the cooking process.

Beef Cuts
Fatten the Cow
Pork fatback is NOT bacon. I learned this the hard way. I used bacon. It's what I had in the refrigerator. I didn't have pork fatback. I should have gone to a butcher, I know. The bacon added too much flavor to this dish. Go get yourself some fatback, ya hear?

According to Chef, bacon has lots of water in it, shrinks more, and leaves more fat in the pan. {And an over-powering bacon flavor!}

Ok, so if you can't get any fatback, the next best thing is salt pork. It's not bacon either. Even if you get this salt pork, you must blanch it for 10 minutes, rinse, dry {repeat?} to remove all the extra salt they use to cure it.

Before using fatback in the beef, the Chef at the demo class said to marinate the fatback in cognac for 10 minutes. {I wish I'd found my notes before making this!}

Then, you cut the fatback into strips so that you can insert this fat into the lean cut of meat you're about to braise. {Sounds like cheating to me. Or, a better cheat might be to buy a well-marbled piece of meat.} The fat helps to keep the meat from drying out.

Peter Hertzmann has a great article about Boeuf à la mode where he also demonstrates his larding technique and in the end discusses whether or not larding was worthwhile.

Marinate
After adding fat to the lean cut of meat, it gets marinated {for up to 24 hours, if you can, for best flavor}.

The marinade has the usual suspects: onions, carrots and a Bouquet Garni. Tomatoes, garlic, red wine, olive oil and cognac round it out. {You're supposed to turn the meat after 12 hours. Oops. Forgot to do that.}

Braise
Now, it's time to braise. This is a brown braise, where food is browned first (seared) and then dark ingredients, such as red wine, are added.

After straining the marinade in a bowl and setting it aside for later, pat the beef dry so that it can sear. When you sauté the beef, you can add a bit of butter with the oil for extra flavor. Searing caramelizes the outside of the beef and adds more flavor. After it's seared {not burnt!}, drain the fat and set the meat aside to rest. Fry up some bacon. {This time you can use bacon as we all know and love it.} Add the vegetables from the marinade and cook them off until golden. Sprinkle some flour on this mixture and cook for a bit to remove the flour taste. The flour will help thicken the sauce at the end. Then add the strained juice from the marinade — -it's purple! This helps deglaze the pan and pick up all those {burned} bits from the bottom of the pan, called fond.
"…[fond] represents a portion of the essential principles of the roast
fallen from it in the process of cooking."
— Escoffier
Add the meat back into the pan, the tomatoes, the Bouquet Garni, and a bit of salt. The liquid should cover 1/3 of the meat. Add more water if it doesn't meet this stringent braising requirement. Add the vegetables from the marinade back to the pot. Bring to a simmer and then put it in the oven, covered, to finish, slowly. Don't let it boil. The liquid and steam cook the meat slowly until it's very tender. If it's cooked too fast, it will be dry and tough.

I found this great article about braising.

Thicken {or Reduce} the Sauce
"Reduce over medium heat until the sauce thickens slightly."
— from the recipe for Éstouffade de Boeuf Provençale (Braised Beef Casserole, Provence Style)
After taking the meat out and putting it aside to rest a spell, reduce the sauce. As you reduce, you should skim away any fat that comes to the surface. Reducing sounds easy, but I always have trouble with this step — not the skimming but the thickening part. I have to resist the urge to quickly make a roux to thicken the juices. I thought I reduced it enough, but my sauce was runny. Back to the stove to reduce it further, I went {the next day}. After reading these tips, I was prepared to dig out my potato flour to thicken it slightly.

The recipe says to add olives to the sauce {but I didn't}.

Recipe: Éstouffade de Boeuf Provençale (Braised Beef Casserole, Provence Style)

Éstouffade de Boeuf Provençale (Braised Beef Casserole, Provence Style) mise en placeYou can find the recipe for Éstouffade de Boeuf Provençale (Braised Beef Casserole, Provence Style) in the book Le Cordon Bleu at Home (affiliate link). To see how the rest of the Whisk Wednesdays group fared with this week's recipe, click here (or check out the sidebar) and then click on each blogger!

Purple Marinade
The marinade is PURPLE!

Tasting Notes
I made some {well, many} mistakes on this seemingly, easy pot roast. Too bacon-y. Too over-cooked. Sauce was runny. But, everyone enjoyed it, even so, and it was even better the next day. {No anchovies this week! Yay} Next time, I'll try Harold McGee's tip to use a cooler oven (200˚F for the first two hours and then 250˚F for the last hour). I'll also check my butcher for fatback. And, I'll spend more time reducing the sauce. And maybe I'll ask for a Moroccon Tagine for Christmas! That should definitely help!

Next Week (September 24)
• Blanquette de Veau à l’Ancienne (White Veal Stew with Onions and Mushrooms) page 55-56

. . . . . . . . . .

Running total: $752.74 + $21.00 (beef) + $6.46 (marinade) + $4.48 (finishing) = $784.68

Butter used so far: 7 pounds, 27 tablespoons

More to Explore:


Does My Blog Look Good In This? DMBLGIT September 2008 Edition

Andrew, who keeps busy with his three blogs (Spittoon, Spittoon Extra, and The Foodie List for UK foodies) and administering the Does My Blog Look Good In This? in his spare time cried out for help with the DMBLGIT for the upcoming months. I sent off an innocent email offering to help host, and here it is, in my lap, with less than 2 weeks left this month!

DMBLGIT is a monthly food photography event, called by some as "the grandest foodporn event available" on the web. Check out the amazing winners from last month at Andreea's blog On (Glorious) Food and Wine. Here are a few other tidbits I've discovered:

- In 2005, Ronald from love Sicily came up with the idea of a food blogging event focused on food photography while on a train from Southampton to London. This was the beginning of DMBLGIT. Now, it's administered via Is My Blog Burning? (IMBB).

- Matt from Matt Bites designed those amazing badges (and will be appearing on Martha: The Martha Stewart Show today, Sept. 17, 2008). Helen from Grab Your Fork was influential in this initiative as well.

- Click HERE to see a compilation of winners from past DMBLGIT contests thanks to Annie and Nate from House of Annie!

I'll keep this brief. Submit your photos. I can't wait to see them, and I'll let you know who the judges are in another post. Since I can't participate this month, I'll share with you the photo I was going to submit:


Consommé Madrilène (Chilled Consommé with Red Peppers and Tomatoes)
Consommé Madrilène
(Chilled Consommé with Red Peppers and Tomatoes)

DMBLGIT?

Judging
Photographs are reviewed by a panel of judges, who score them in three categories: edibility, aesthetics, and originality. The host then compiles the scores to determine the winners. The specific things the judges will be looking for are as follows:

- Aesthetics: composition, food styling, lighting, focus, etc.
- Edibility: “does the photo make us want to dive in and eat the food?”
- Originality: the photograph that catches our attention and makes us want to say “wow!”, displaying something we might not have seen before.
- Overall Winner: top overall scores in all three categories combined.

There are three overall winners for photographs with the highest point totals in all three categories combined, and one winner in each of the three individual categories.

Rules
- Only one entry per person (a single photograph, no diptychs)
- The photograph must have been taken by you.
- The photograph must have appeared on your blog during the month of August.
- Entries must be received by September 30, 2008 at midnight EST (U.S.)

What do you have to do to join the event?
Send your entry to whiskfoodblog {at} gmail (dot) com with DMBLGIT as the subject. Please include the following:
- your name
- your blog’s name and URL
- your photograph’s title
- the URL of the post containing the photograph
- type of camera used, lens if you wish
- Please send photos in an attachment to your email in a jpeg format, of no more than 500 pixels in width

Gallery
All submissions will be posted to the September 2008 DMBLGIT gallery, which will be updated as I receive entries. Please give me a few days to update the gallery with your submission! And make sure yours is included once I start publishing them.

I look forward to your entries. Good luck!
~Shari


Tuesday, September 16, 2008

Tuesdays with Dorie—Chocolate Chunkers

Chocolate ChunkersThree types of chocolate chunks (bitter, semi, white), salted peanuts, raisins, {with a bit of batter thrown in to keep all the chunks together}. This is really a brownie disguised as a cookie.

In the introduction to the cookie, Dorie says these cookies are based on ones at Soho Charcuterie (called Chocolate Globs) and Sarabeth's (called Chocolate Chubbies), and is also a distant relative of Maida Heatter's Mulattoes. According to Ina Gartner, her brownie recipe is based on these same cookies, and they used to fly out the door of her specialty food store. After tasting these chocolate chunkers, I believe it!
"A balanced diet is a cookie in each hand."
— Author unknown
Playing Around
Chocolate Chunkers in ring moldsA while ago, I found these vintage aluminum ring molds online on our local Freecycle Network. After spraying the molds with cooking spray, I spooned some of this sticky, chunky cookie dough into the molds and baked them off. Straight from the oven, they were like a rich brownie. After cooling, they became hard like a cookie and are better eaten by breaking pieces off with your fingers. I tried the same thing with my mini bundt cake pan with the same results.

Chocolate Chunkers in mini bundt pans

Recipe: Chocolate Chunkers


Ingredients for Chocolate ChunkersYou can find the recipe for Chocolate Chunkers in the book Baking: From My Home to Yours (affiliate link) by Dorie Greenspan. To see how the rest of the TWD group fared with this week's recipe, click here and then click on each blogger! Thanks to Claudia of Fool for Food who chose the recipe for this week.

Chocolate Chunkers
Tasting Notes
These were a hit at our house. Personally, I liked them with the raisins, but I left them out of half the batch for some of my more picky eaters. The salty nuts cut the sweetness of the chocolate nicely.
"Think what a better world it would be if we all, the whole world,
had cookies and milk about three o'clock every afternoon
and then lay down on our blankets for a nap."
— Robert Fulghum
Recipe for Next Week (September 23)
Dimply Plum Cake on page 41 chosen by Michelle of Bake-en.

More to Explore:


Saturday, September 13, 2008

The Omnivore's 100 Poll


In August, a meme was started by John of Very Good Taste that has become viral among foodies: The Omnivore's 100. I've done it. My friends have done it. We ooh and aah over how many each of us have tasted. It's kinda fun. Of course, everyone has their own ideas about what should and shouldn't be on the list. Here are some other lists you might want to check out:

• A vegetarian one by Barbara at Tigers & Strawberries.
• A vegan one by Hanna at Bittersweet.
• A Japanese one by Maki at Just Hungry.

I keep seeing it pop up in many food blogs, and I think a POLL is in order. I'd love to know how many of The Omnivore's 100 you've tried. 

The poll is in the upper-right corner of my blog! You can change your vote at a later date, too.

{As of September 13, 2008, I've tasted 53.}

I think this is the start of an idea for a New Year's Eve party. Everyone can bring something they haven't tried from the list as an appetizer. The one who's tried the most wins a prize. Any other omnivore party ideas?
"All of life is a dispute over taste and tasting."
—Friedrich Nietzsche

More to Explore:


Friday, September 12, 2008

Tuesdays with Dorie {Rewind}—Quintuple Chocolate Brownies

Quintuple Chocolate BrowniesI'm slowly working through the recipes I missed before I joined Tuesdays with Dorie and Week 2 of TWD was all about chocolate! Four types of chocolate, in fact. In a brownie. {Actually, the recipe called for 3 ounces of unsweetened chocolate, but I used semi-sweet instead, and it turned out great!}
All I really need is love but a little chocolate now and then doesn’t hurt!
— Lucy, "Peanuts"
4 types of chocolate
Using the best chocolate I could find (Callebaut) made these brownies taste even better. As well, the crunch from the pecans that I used was a nice contrast to the chocolate.

Recipe: Quintuple Chocolate Brownies

Ingredients for Quintuple Chocolate BrowniesYou can find the recipe for Quintuple Chocolate Brownies in the book Baking: From My Home to Yours (affiliate link) by Dorie Greenspan. To see how a few of the early TWD adopters fared, click Laurie of quirky cupcake, Michelle of Sugar and Spice, and April of Abby Sweets.

Yield: This recipe made 24 regular-sized cupcakes.

Quintuple Chocolate BrowniesTasting Notes
They were the best brownies I've ever tasted! And my nephew and daughters had to earn their brownie by posing for some food photography! In the end, they thought it was worth it! {However, one picked off all the chocolate-coated purple sunflower seeds and gave them to me. Another didn't like the nuts, but I had only put nuts in half the batch so she hunted for one without the offending ingredient. And another wanted hers without frosting! Besides that, they were a huge hit!}
"Anything is good if it's made of chocolate."
— Jo Brand
Other Brownie recipes you may like:
Brownie Pops
French Chocolate Brownies