Friday, April 18, 2014

Cheers to Life with a Jamaican Sorrel Cocktail


It’s been a while since I've posted. I’ve missed sharing my thoughts and food experiences, and life is all about sharing moments: the highs, the lows, and everything in between.

Recently, I met someone whose integrity and authenticity deeply inspired me. It made me reflect on what being authentic truly means—being genuine, real, and sincere. These are qualities I value in others and strive to embody myself. Of course, I don’t always succeed, and I know I’m not alone. Navigating life with an authentic compass is a journey, and while the arrow doesn’t always point perfectly, I know I’m heading in the right direction.

Thanks to another authentic individual I met a few years ago,I’ve had the chance to travel to warm climates this past winter. One highlight was my trip to Jamaica in November for an assignment with Taste & Travel Magazine. During my visit, I discovered a new taste—sorrel, a key ingredient in Jamaican cuisine. Sorrel comes from a shrub with small pink flowers, part of the hibiscus family (not to be confused with the garden herb sorrel). Jamaicans use its petals to craft refreshing drinks and flavorful condiments. At Hotel Mockingbird Hill, I enjoyed a sorrel cocktail while gazing at lush green hills and the sparkling ocean. The vibrant flavors and tranquil setting created an unforgettable memory.

[The 2014 Summer issue of Taste & Travel Magazine will include my article about Jamaica.]

 Sorrel Petals

For those curious about exploring sorrel’s unique taste, here’s a recipe to try at home.

Jamaican Sorrel Cocktail

Ingredients:
1 lb sorrel, thoroughly washed
2-4 oz ginger root, grated
8-12 pimento (allspice) berries
8 cups water
Sugar syrup, to taste*
Sparkling wine or rum (optional) 
Ice

Instructions:
1. Combine sorrel, ginger and pimento berries in a bowl.
2. Boil water and pour over the mixture. Allow to stand 4-6 hours, then strain.
3. Sweeten to taste with sugar syrup. Serve over ice with sparkling wine or rum for a delightful twist.

*To make sugar syrup, bring 2½ cups water and 1¼ cups sugar to a boil. Allow to cool.

Tip: You can find sorrel at specialty Caribbean markets.

This recipe is courtesy of Chef Barbara Walker from Hotel Mockingbird Hill in Port Antonio, Jamaica. www.hotelmockingbirdhill.com


More to Explore:


Monday, February 6, 2012

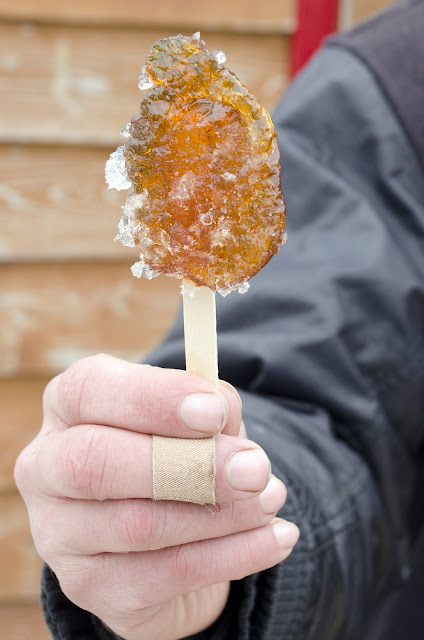
Ottawa and Taffy on the Snow: Nature's Sweetest Winter Treat


Taffy on the Snow is nature's best candy. Though I usually associate it with a sugar shack tradition, I was excited to see it offered at Ottawa's Winterlude. As part of our skate on the Rideau Canal Skateway, which is the world's largest skating rink, we stopped to indulge in this sweet treat.

While talking to the taffy maker, I learned that in one week he has gone through 300 kg (over 600 pounds) of maple syrup! For the "snow", he grinds up bags of ice cubes. And each taffy pop costs $3.

The pure maple syrup is boiled to the soft ball stage (about 235˚F).


boiling the maple syrup


Then, it's poured onto the snow and allowed to cool slightly. Using a popsicle stick, the taffy is rolled around the stick into a ball.


pouring the maple syrup

placing the popsicle sticks

letting them cool

rolling the taffy


The crunchy snow crystals on the taffy make an unstable but delicious marriage of ice and warmth. And it just might be a better business idea than a lemonade stand!

Click here for more ideas about baking and cooking with maple syrup.


Monday, January 9, 2012

Bringing Mexico Home: Pescado Zarandeado, A Flavorful Mexican Grilled Fish Tradition


Pescado Zarandeado is a signature Mexican dish with regional variations depending on the chef. The preparation typically involves marinating a whole fish in a blend of lemon juice, garlic, soy sauce, and lime, then butterflying and grilling it over an open flame. 

The fish of choice is often Pargo (Snapper) due to its rich fat content, which keeps it moist during grilling. Alternatives like Snook or Red Snapper also work beautifully for this dish. 

The Origins of Pescado Zarandeado 

This iconic dish is believed to have originated on Mexcaltitán Island in Nayarit, Mexico. Today, restaurants like Diego’s in Mazatlán have elevated this dish while staying true to its roots. Chef Diego Becerra’s version features a unique mayonnaise-based sauce infused with garlic, oregano, soy sauce, herbs, and cilantro, offering a flavorful twist.  

Traditionally, Pescado Zarandeado was smoked using mangrove wood. However, to protect mangrove forests, chefs now use mesquite wood, which imparts a similar smoky aroma.  


A Beachside Feast  

When Chef Diego prepared Pescado Zarandeado on the beach outside his restaurant, the experience was unforgettable. The smoky aroma of the fish grilling over an open fire, the sound of waves, and children playing nearby created a memorable atmosphere.  


Served on a large platter, the fish was accompanied by tortillas, refried beans, salsa, onions, rice, and lime wedges. Each tortilla was a celebration of Mexican flavors, filled with moist, tender, and perfectly seasoned fish.  


Recipe: Pescado Zarandeado

from link

Serves: 6


Ingredients:

For the marinade:
1/3 cup olive oil
1/2 cup soy sauce
1/4 cup lime juice
6 cloves garlic, minced

For the fish:
1 3-pound fillet Snook, Dorado, Bonita, Red Snapper, Pargo or other white-fleshed fish suitable for grilling
6 tomatoes, deseeded and quartered
2 green bell peppers, cut into thick strips
2 red bell peppers, cut into thick strips
1 purple onion, cut into thick slices
6 jalepeños, sliced

Instructions:

Whisk the marinade ingredients. Let steep to blend flavors for about 15-30 minutes. pour over the fish and let the fish marinate for 30 minutes.

If you don't have a grill or fish cage (or if it's winter!), you can put the fish in foil with the vegetables.

Grill (or bake the fish in the oven at 375° until the meat flakes). The time it takes depends on how large the fish is. My small Red Snapper took 20-30 minutes in the oven.

Serve with salsa, guacamole, refried beans, rice, limes, and tortillas.


More to Explore:

Acknowledgment: Special thanks to www.gomazatlan.com for hosting meat the 2011 Gran Fiesta Amigos. All opinions and stories shared are entirely my own.  


Monday, November 28, 2011

Bringing Mexico Home: Huevos Divorciados, A Taste of Mexico with a Twist


For many, a palm tree symbolizes relaxation and serenity. For me, it’s a centering thought, one I turn to during moments of stress. Recently, I found myself not only admiring the palms in Mazatlán, Mexico, but also savoring the local flavors that capture the essence of this vibrant region. 


Hotel Riu, Mazatlán, Mexico

Among the culinary delights I experienced was Huevos Divorciados, a unique spin on the classic Huevos Rancheros. This dish creatively separates two poached eggs, placing them on opposite sides of the plate and dressing each in its own distinct sauce. One egg is topped with a zesty green salsa made with tomatillos, while the other is adorned with a smoky red chili salsa. The presentation is completed with a variety of sides—refried beans, rice, guacamole, cheese, and onions—that divide the two eggs like an edible border.  

Though the sandy beaches of Mazatlán may be far away, the flavors of Huevos Divorciados can easily be recreated at home to share with family and friends. 

Recipe: Huevos Divorciados

Serves: 6

Ingredients:

For the salsa:
3 medium tomatoes, quartered
½ onion
½ hot green chile or 1 teaspoon canned green chilies
3 sprigs cilantro leaves
½ red bell pepper
2 cloves garlic
1/8 teaspoon salt
½ lemon, squeezed

For the guacamole:
½ large ripe avocado
2 tablespoons green onion, minced
1 tablespoon fresh cilantro, chopped
½ teaspoons Asian chile sauce
2 teaspoons freshly squeezed lemon juice
¼ teaspoon salt

Instructions:

For the tortillas:
6 tortillas, cut into rounds that will fit a muffin tin

For the poached eggs:
12 eggs, poached

Prepare the salsa:
Put all ingredients in a food processor and whiz until chunky. Drain.

Prepare the guacamole:
Put all ingredients in a food processor and whiz until smooth.

Prepare the tortillas:
Preheat oven to 350°F. Cut the tortillas into rounds that will fit a muffin tin. Carefully push a round into a muffin cup. Bake until golden, about 5 minutes.

Prepare the poached eggs:
Poach 12 eggs.

To assemble:
Put the poached egg into the baked tortilla cup. Top with salsa on half of the cups. Top with guacamole on the other half. Garnish each plate with refried beans and cilantro along with a tortilla cup of each type. Serve immediately.


Tips
Ottawa Recommendation: For those in Ottawa, Canada, check out the Huevos Rancheros at Edgar—widely regarded as the best in the city. (Sadly now closed.)


Mazatlán Recommendation: If you find yourself in Mazatlán, enjoy this dish at iconic spots like the Shrimp Bucket in Olas Altas.


More to Explore:

Acknowledgment: Special thanks to www.gomazatlan.com for hosting meat the 2011 Gran Fiesta Amigos. All opinions and stories shared are entirely my own.  


Monday, November 14, 2011

Bringing Mexico Home: Horchata, A Taste of Mexico’s Soul

 
Horchata

Travel and food are the perfect pair. Exploring new places, savoring unfamiliar flavors, and capturing memories in a sunset’s glow or the texture of sand beneath my toes restores my spirit. On a culinary tour of Mazatlán, Mexico, I discovered one of my favorite drinks: Horchata, a creamy, cinnamon-infused beverage that feels like a hug in a glass.

Mazatlán, often called the "Pearl of the Pacific," gave me the pearl-colored refreshment that I couldn’t wait to recreate back home. After a warm morning exploring the village of El Quelite, the Horchata served at El Mesón de los Laureanos quenched my thirst and captured the region’s essence.


sunrise in  Mazatlán, Mexico

 
 sunset in Mazatlán, Mexico

One year ago, I was recovering from surgery to remove more thyroid cancer. A year later, I’m feeling the sand between my toes, listening to the waves crash on the beach, and enjoying a culinary tour of Mazatlán, Mexico.

One thing I love to bring home is a favorite taste to make in my own kitchen. Mazatlán is known as the Pearl of the Pacific. For me, the pearl-colored beverage, Horchata (or-CHA-tah), will always remind me of Mazatlán and Mexico. It was also one of the first things I looked up when I got home.

Horchata is often described as “liquid rice pudding,” made by soaking rice (sometimes with nuts) and cinnamon in water or milk, sweetening it, and enhancing it with vanilla and other spices. While modern Horchata uses rice, the drink has its origins in Spain, where the Moors made it from tiger nuts (chufas). When the Spanish brought Horchata to the New World, they adapted it to local ingredients like rice, almonds, and squash seeds.

Legend says that King James I of Aragon, after tasting Horchata in Valencia, exclaimed:

"Açò és or, xata!" ("This is gold, darling!").

I tasted the best Horchata at a small village restaurant called El Mesón de los Laureanos in El Quelite just 45 minutes outside of Mazatlán. It wasn’t too sweet and quenched my thirst after a hot morning of sun and tequila tasting:


Variations include almonds, lime zest, or even pecans and popcorn. Momofuku Milk Bar serves a Horchata Soft Serve Ice Cream with Cinnamon. And adding a dash of Tequila can improve its already soothing qualities. Salud!


Recipe: Horchata

Ingredients:

For Horchata Base:
6 tablespoons long-grained rice
2 cinnamon sticks
2½ cups warm water

For sugar syrup:
½ cup sugar
1 cup water
1 teaspoon pure vanilla extract

To finish:
Milk, to taste
Ice
Ground cinnamon and nutmeg, for garnish

Instructions:

In a blender, blend the rice to break it up into small pieces. In a large bowl, combine the rice, cinnamon sticks and water. Cover and store in the refrigerator for 6 hours, or overnight.

To make the sugar syrup, melt sugar and water in a medium-heavy pot over medium-high heat until the sugar is melted. Add the vanilla. Let cool.

Remove the cinnamon sticks from the rice mixture. Strain the rice mixture through cheesecloth and squeeze out the rice to get the entire flavor out of the rice. Add the sugar syrup, to taste.

To finish, in a blender add 1 cup of the strained rice/sugar-syrup mixture and ½ cup milk (or to taste). Blend until frothy. Pour into a glass and garnish with ground cinnamon and nutmeg.

For Horchata Coffee, prepare a double espresso. Froth ½ cup milk with ½ cup Horchata. Mix and garnish with ground cinnamon and nutmeg.

Links
The Bojon Gourmet: Horchata Ice Cream
TastyType: Horchata Ice Cream 
Vampire Weekend – Horchata: “In December, drinking horchata | I'd look psychotic in a balaclava”


More to Explore:

Acknowledgment: Special thanks to www.gomazatlan.com for hosting meat the 2011 Gran Fiesta Amigos. All opinions and stories shared are entirely my own.  


Monday, October 24, 2011

Easy Cilantro Salad Recipe with Simple Vinaigrette


Not all salads need to be complicated, and this Cilantro Salad proves just that. It’s a quick and easy dish with fresh ingredients, topped with a zesty vinaigrette. If you’re a fan of cilantro (or looking to give it another try), this salad is a perfect way to let its bold flavor shine.

Also known as Chinese Parsley, cilantro is the leafy green of the coriander plant. Its unique flavor can be polarizing—some love its freshness, while others describe it as soapy. But give it a chance, and you might find yourself craving its herbaceous zing.

Did you know? In ancient Chinese culture, cilantro was used in love potions and believed to bring immortality.

Why You’ll Love This Salad
  • Perfect for busy days or as a light side dish.
  • Packed with fresh greens, tomatoes, and the distinctive flavor of cilantro.
  • Add avocado, grilled chicken, or your favorite nuts for a heartier option.

Tips for Success
  • Use fresh cilantro for the best flavor. Avoid bunches with yellowing or wilting leaves.
  • Balance the vinaigrette by adjusting lime juice and garlic to your preference.
  • For extra crunch, sprinkle toasted seeds or nuts, such as pumpkin seeds, on top.
Recipe: Cilantro Salad

Serves: 6

Ingredients:

For the vinaigrette:
1/4 cup olive oil
2 tablespoons lime juice
1 clove garlic, minced
salt and pepper, to taste

For the salad:
4 cups butter lettuce, cleaned and torn into bite-sized pieces
1 cup cherry tomatoes, halved
1/2 cup fresh cilantro, chopped

Instructions:

Whisk the ingredients for the vinaigrette. Mix the salad ingredients. Just before serving, mix the vinaigrette with the salad.


Monday, October 17, 2011

Easy Caramel Apple Tarts with Puff Pastry – Perfect Fall Dessert


Looking for a delicious dessert idea? These Caramel Apple Tarts are the perfect treat for fall. Made with puff pastry, diced apples, and rich homemade caramel, this recipe transforms a classic fairground favorite into a delightful baked dessert. Whether you make a full pie or individual tarts, the result is always irresistible.

If you don't have puff pastry in your refrigerator, just use a regular pie crust. If you don't have that, just make caramel apples!

Why You’ll Love This Recipe
  • A great way to use up fresh apples during apple-picking season.
  • Use puff pastry for a light, flaky crust or substitute with pie crust.
  • Serve as a show-stopping dessert with vanilla ice cream at your next gathering.
Recipe: Caramel Apple Tarts

Makes 1 pie or 12 individual tarts

Ingredients:

1 cup sugar
1 cup brown sugar
1/2 cup butter, cut into pieces
3/4 cup sweetened condensed milk (or 300-mL can)
2/3 cup golden corn syrup
1/4 cup maple syrup
1 teaspoon honey
1 teaspoon vanilla extract
1/4 teaspoon salt

6 apples, peeled and diced

Puff Pastry

Instructions:

In a heavy saucepan over medium heat, stir all ingredients until a temperature probe reaches 236°F. Make sure you stir constantly and ensure the mixture doesn't stick to the bottom and start to burn. Let cool.

Meanwhile, peel and dice the apples. Stir the apples into the cooled caramel mixture.

Preheat the oven to 375°F.

Roll out the puff pastry.

Fill the tart shell (or individual tart shells). Bake for 50-60 minutes (30-40 minutes for individual tart shells). Let cool. Serve with vanilla ice cream.


More to Explore:


Monday, October 10, 2011

The Magic of Puff Pastry: Flaky, Buttery Perfection


Puff pastry is a magical dough that transforms simple ingredients into flaky, buttery masterpieces. Through a process called lamination, layers of butter are trapped between dough, creating steam during baking that pushes the layers apart. The result? A light and airy pastry that’s as impressive as it is delicious.  

Tips for Perfect Puff Pastry:
  • Keep It Cool: Butter is the key to puff pastry's signature layers. Keeping both the dough and butter cold is essential to prevent the butter from melting or seeping out.  
  • Roll with Care: Use a light touch when rolling to maintain the distinct layers. If the butter starts to soften or squish out, pop the dough back in the fridge.  
  • Be Patient: While the process of rolling and folding can be time-consuming, the reward of perfectly flaky pastry makes it worth the effort.
Now that I have a block of puff pastry, what should I make with it?
Recipe: Puff Pastry


Ingredients:

1 1/2 cups all-purpose flour
3/4 cup cake flour
1 teaspoon salt
2/3 to 3/4 cup water
2 tablespoons unsalted, butter, melted
14 tablespoons unsalted butter
1 egg, lightly beaten, for glazing

[You can find the recipe for Puff Pastry in the book Le Cordon Bleu at Home (affiliate link) or here.]

Instructions:

In a stand mixer fitted with the dough hook, combine the flour and salt. Pour in the water and melted butter. The dough will be shaggy. Bring it together into a ball and score an "x" in the top. Cover with plastic wrap and chill in the refrigerator for about 30 minutes.

While the dough is chilling, place the butter between plastic wrap and form it into a square that's 3/4 inch thick.

To roll the dough, make arms or flaps to form a plus sign. The middle should be mounded slightly. The arms must be long and square enough to cover the middle. (See this post.)

Place the formed butter in the middle and fold the arms over the butter, stretching the dough if needed. Seal in the butter. Using a rolling pin, press on the dough to seal the edges and flatten the square.

Roll the dough about 7 inches wide and 21 inches long. Fold the top down and the bottom up to make an envelope. Turn a quarter turn. Roll again to 7 inches wide and 21 inches long. Fold again. Mark the dough with two fingerprints and chill in the refrigerator for about 30 minutes.

Repeat the rolling/folding/turning and then chill. Repeat once more. Now the dough has been turned six times and is ready to be formed into pie crust, cheese sticks, turnovers, napoleons or whatever you fancy. (The dough keeps well in the freezer, too.)

Next Time
Danoises (Danish) in Le Cordon Bleu Complete Cook Home Collection (affiliate link) page 485

Links
White on Rice: Strawberry Danish Recipe
Not without Salt: Quick Puff Pastry
Dorie Greenspan: Puff Pastry Pinwheels
::Whisk::
I'm baking my way through a cooking school curriculum using the Le Cordon Bleu at Home (affiliate link) cookbook. The "classes" are based on the Le Cordon Bleu curriculum found online and used as a guideline. Not all the items in the curriculum are in the cookbook, but most are. Where the items are not in the book, I try to find a suitable substitution.

More to Explore:


Monday, October 3, 2011

The Art of Brioche: A Buttery Indulgence Worth the Wait

If you're patient, in a few hours you can make brioche. You just need a teaspoon of yeast, a half dozen eggs, and almost half a pound of butter along with the usual breadlike suspects.

Brioche is classified as a viennoiserie (Viennese Specialties), which are baked goods made from a yeast-leavened dough that is enriched with milk, sugar, eggs, or butter. In this case, lots of eggs and butter. Brioche isn't a low-fat treat but an indulgence.

The trickiest part of this recipe is the dough's stickiness. But leave the pasty dough to the hook, forget the traditional, hand-kneading method, and go check your email. Then, while it's rising, do some gardening. And after you've formed the rolls, go downtown to buy a new gadget. Then eat some cake.

Original: "Qu'ils mangent de la brioche."- Marie Antoinette
Translation: "Let them eat rich, expensive, funny-shaped, yellow, eggy buns."
-Urban Legends
Tips for Perfect Brioche  

1. Embrace the Stickiness: The dough will be sticky; let your mixer’s dough hook do the work.  
2. Be Patient: Brioche takes time, but the slow rise develops flavor and texture.  
3. Use Butter Generously: Don’t skimp—this is where brioche gets its magic.  

Recipe: Brioche

Makes: 16 individual rolls


Ingredients:

3 tablespoons milk, warmed
1/4 oz package dried yeast
3 cups bread or all-purpose flour
1/4 cup sugar
1 teaspoon salt
6 eggs, lightly beaten

3/4 cup unsalted butter, at room temperature

1 egg beaten and mixed with 2 tablespoons of water, for glaze

[You can find the recipe for Brioche in the book Le Cordon Bleu Complete Cook Home Collection (affiliate link).]

Instructions:

In a small bowl, proof the yeast in some warm milk. In a stand mixer fitted with the dough hook, whisk all the ingredients. Add the yeast mixture. Knead until the dough forms a smooth ball. In an oiled bowl, place the dough and cover. Let rise at room temperature for 2 to 2 1/2 hours, or until doubled in size.

Punch down. In a stand mixer fitted with the dough hook, add the room-temperature butter to the dough and knead until the dough is smooth again. Cover and let rest for about 5 minutes.

Form into rolls. Let rise for 1 to 1 1/2 hours. Preheat oven to 400°F. Bake for 15-20 minutes, or until golden brown. Let cool.

Here's a video showing how to make it by hand.


Tasting Notes
The crust on my brioche was nice and crunchy, but I should have pulled mine out of the oven sooner than I did. Overall, they have a nice texture and warming them in the microwave for about 10 seconds makes them even tastier.

Next Time
Puff Pastry in Le Cordon Bleu Complete Cook Home Collection (affiliate link) page 542

Links
La Tartine Gourmande: Simplest Brioche
Julia Child: Brioche Dough (video)
Dorie Greenspan: Brioche

::Whisk::
I'm baking my way through a cooking school curriculum using the Le Cordon Bleu at Home (affiliate link) cookbook. The "classes" are based on the Le Cordon Bleu curriculum found online and used as a guideline. Not all the items in the curriculum are in the cookbook, but most are. Where the items are not in the book, I try to find a suitable substitution.

More to Explore:


Monday, September 26, 2011

Croissants: A Beginner's Journey to Parisian Perfection


Making croissants at home can seem daunting, but if you’ve mastered puff pastry, you’re halfway there! Croissants are essentially "baby" puff pastries—requiring fewer turns and an overnight rest. While they demand patience and practice, the reward is a flaky, buttery masterpiece that rivals the best Parisian bakeries.

My standards for croissants are high: I expect a rich, golden, crinkly surface; I expect it to explode (quietly) when bitten into; and I expect every crumb to be loaded with butter.
- Pam Frier, Times Columnist
Croissant-Making Simplified  

1. Fewer Turns: Unlike puff pastry, croissants require fewer laminating folds, making the process more approachable.  
2. Overnight Rest: Resting the dough in the refrigerator develops flavor and makes it easier to work with.  
3. Practice Makes Perfect: Achieving that perfect flakiness takes time, but every attempt is deliciously rewarding. 


Recipe: Croissants

Makes: 12-16

Ingredients:

1 pound all-purpose flour
1 teaspoon salt
1/4 cup sugar
1 1/4 cups milk
1/2 ounce fresh yeast or 1/4 ounce dried yeast
1 1/3 cups unsalted butter, at room temperature
2 egg yolks, lightly beaten

[You can find the recipe for Croissants in the book Le Cordon Bleu Complete Cook Home Collection (affiliate link).] You can watch this video to see the method: How to Make Croissants.

Tasting Notes
With all that butter and fresh dough, what's not to love about these croissants. I will keep practicing and aim for crumb-explosion perfection.

Croissant in Paris


Next Time
Brioche in Le Cordon Bleu Complete Cook Home Collection (affiliate link) page 430

Links
Food Timeline's Croissant History
Food & Wine: Lamination: The Art of the Perfect Croissant

Croissant in Paris
::Whisk::
I'm baking my way through a cooking school curriculum using the Le Cordon Bleu at Home (affiliate link) cookbook. The "classes" are based on the Le Cordon Bleu curriculum found online and used as a guideline. Not all the items in the curriculum are in the cookbook, but most are. Where the items are not in the book, I try to find a suitable substitution.

More to Explore:


Monday, September 5, 2011

Chocolate Meringue Kisses with Mousse: A Simplified Concorde


For those who dream of mastering the intricate Concorde Cake but crave a simpler alternative, chocolate meringue kisses filled with mousse are the perfect solution. Inspired by Gaston Lenôtre's legendary dessert, these mini treats retain the decadence of the original without the complexity.

The real deal consists of layers of chocolate meringue and chocolate pudding with sticks of chocolate meringue to decorate the outside. It was created by the famous French pastry chef Gaston Lenôtre to celebrate the first flight of the Concorde. Or is it named after the Place de la Concorde in Paris?


The recipe for Lenôtre’s Concorde appears in Lenôtre's Desserts and Pastries (affiliate link). At age 14, Pierre Hermé started apprenticing with Lenôtre and a recipe for Concorde can also be found in Chocolate Desserts by Pierre Hermé.

The Pastry Chef's Companion: A Comprehensive Resource Guide for the Baking
by Glenn Rinsky, Laura Halpin Rinsky


Someday, I’ll make this supersonic Concorde cake, but these little chocolate kisses were simple yet decadent.

Recipe: Chocolate Meringue Kisses with Mousse

Serves: 6

Ingredients:

Chocolate Meringue:
1 cup confectioner’s sugar
6 tablespoons cocoa powder
5 egg whites
¾ cup granulated sugar
½ teaspoon vanilla extract

Chocolate Mousse:
3½ ounces semi-sweet chocolate, cut into small pieces
4 tablespoons unsalted butter
5 tablespoons granulated sugar
2 egg yolks
4 egg whites

Confectioner’s sugar, for dusting

[You can find the recipe for Concorde (Chocolate Meringue Cake Filled with Chocolate Mousse) in the book Le Cordon Bleu at Home (affiliate link) or here.]

Instructions:

1. Prepare the Meringue:
  • Preheat the oven to 250°F (120°C) and line a baking sheet with parchment paper.
  • Beat egg whites until soft peaks form. Gradually add sugar, beating until stiff, glossy peaks form.
  • Fold in the sifted cocoa powder gently to maintain the airy texture.
  • Pipe or spoon small mounds onto the baking sheet.
  • Bake for 1 hour, then turn off the oven and let the meringues cool completely inside.
2. Make the Chocolate Mousse:
  • Melt the dark chocolate and let it cool slightly.
  • Gently fold the whipped cream and vanilla extract into the chocolate until smooth.
3. Assemble the Kisses:
  • Pipe or spoon chocolate mousse onto the flat side of a meringue.
  • Top with another meringue to create a sandwich.
4. Chill and Serve:
  • Refrigerate the assembled kisses for at least 30 minutes before serving.

Tasting Notes
“I like the chewiness.”
“This is good; this is real good.”
“Can I have another?”
These were quotes from my three young taste testers.

Next Time
Croissants in Le Cordon Bleu Complete Cook Home Collection page 429

Links
Video: Chocolate Concorde cake recipe
Food & Wine: Concorde Cake
No Special Effects’ Concorde
Carnival’s Concorde Cake

::Whisk::
I'm baking my way through a cooking school curriculum using the Le Cordon Bleu at Home (affiliate link) cookbook. The "classes" are based on the Le Cordon Bleu curriculum found online and used as a guideline. Not all the items in the curriculum are in the cookbook, but most are. Where the items are not in the book, I try to find a suitable substitution.

More to Explore: